

 Another month over! I'd like to say things are settling down around here since our wedding, but I'd be lying. It's just as crazy busy as usual, but thats the way we like it. Just like the pic above by Amanda Pratt Photography.
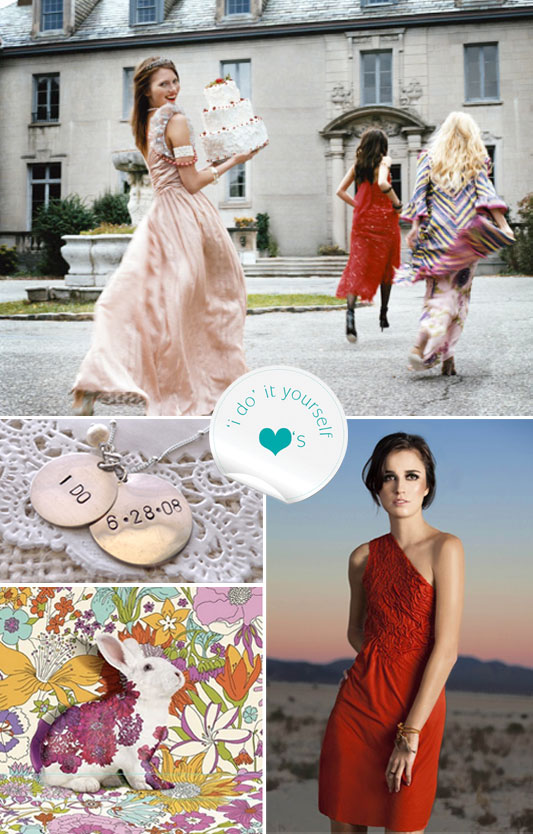
 This month this cute little hand stamped necklace caught our eye, marked with the words I do and your wedding date from Chantelle Nicole Designs. This stunning smocked dress from Kali Oseano Clothing would be just perfect for an Aussie outback inspired wedding. And of course it was Easter this month, so we hope the bunny brought you loads of chocolate, cutest pic via cafe cartolina. How did they get that bunny to sit still long enough to paint him though? :)
We hope you enjoyed this months Chinese Australian wedding. Thanks to everyone who commented and contributed. Next month things are starting to cool down...
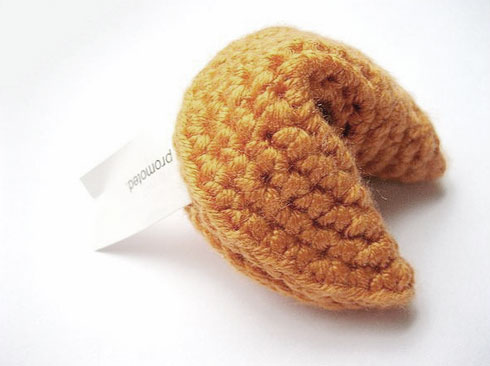 Following on from yesterdays post on how to DIY your own paper fortune cookies, how about crochet ones!? Jennipho has put together a cute little video to show you how to finish off the cookie once you have made a simple crochet circle. Watch the video here or visit Jennipho's etsy shop to buy handmade crochet cookies.
You will need:
paper (not so thick that they wont fold)
3 inch circle punch
scissors
double sided sticky tape
DIY project:
Step 1. Print out our FREE template (click here to go to the download) and punch out the circles
Step 2. Loosely fold the circle in half with out creasing
Step 3. Place a little bit of double sided sticky tape near the edge of the circle and pinch the sides back until it lightly sticks and folds.
Step 4. Cut up the fortune strips and slip one into each paper cookie


Turn your wedding photos into beautiful watercolour sketches in ten easy steps. This is a fairly straightforward photoshop tutorial but we do assume you have a basic knowledge of the program including using layers.
This effect doesn't work with every image, but something that already has a nice soft feel to it will be best.

DIY project:
Step 1. Duplicate the layer and make that new layer black and white by Image > Adjustments > black and white.
Step 2. Duplicate this new black and white layer and invert it by Image > Adjustments > Invert.

Step 3. Set the blending mode for this layer to colour dodge, don't worry, the image should disapear.
Step 4. Now go to Filter > Other > Minimum and use a radius of between 1 and 5

Step 5. Double click in the layers palette on what should be now called layer copy 1, this will bring up the layer styles options. Holding down the alt or option key click on the little tags under the underlaying layer bar. This frees them up to be moved around individually. You can see by adjusting these tags it gives more depth to the sketch effect. When your happy and have something similar to our example hit ok.
Step 6. Now you could leave it as this as it actually looks pretty good, but we're going to carry on and add a little colour back. Select Layer 1 copy and Layer 1 and merge them together.
Step 7. With the original layer seleceted go to Image > Adjustments > Hue/Saturation and increase the saturation to about +50
Step 8. Now reduce the opacity of the top layer (layer 1 copy) to about 85%.
Step 9. On this top layer, with a large soft brush and opacity set very low, slowly erase areas of skin to bring a little more colour back. Go over some areas more if you like as though you where painting the colour back in. You can also do small sections of hair too.
Step 10. Flatten the image and save.


As always these amazing cakes just look too impressive to eat... oh well maybe I could just force myself to have a slice :)
Credits: Dark chocolate dragon design on top of white chocolate, by the organic chocolate cake company. Gorgeous icing detail of frog style knot buttons on this cake via the knot. Cascading cherry blossoms and the double happiness symbol from the pink cake box. Beautiful birdcage cake by Lark Cake Shop.

Fall in love with our latest wedding invitation. The tree of love is a romantic hand drawn illustration perfect for weddings and great for engagement invites too. Available in our online shop.


